01-01 - Footprint & CenterPoint#
The following example illustrates how to calculate the image’s footprint and center point.
To map image coordinates one need minimum the following information:
Image EOR (exterior orientation: Position and Attitude of the projection center
Image IOR (inner orientation: Focal length (the minimum to know), principal point and distortion parameters
3D information about the geometry which is captured by the image (Terrain Model, Mesh). In this example terrain data in form of a 1 meter resolution DEM is used from queensland.
For the following image the footprint and center point should be mapped:

Following Steps need to be done:
Create camera class (IOR of image)
Create image class (Containing EOR and camera)
Create mapper class (3D data for mapping)
Map footprint and center-point (Function calls of image class)
Import Modules#
First we will import all necessary Modules. The Raster Mapper module will be used for mapping.
import logging
from pathlib import Path

import numpy as np
from pyproj import CRS
from pyproj import network as pyproj_network

from weitsicht import (
    CameraOpenCVPerspective,
    ImagePerspective,
    MappingRaster,
    Rotation,
)

logging.basicConfig(level=logging.WARNING)
logging.getLogger("weitsicht").setLevel(logging.DEBUG)

# path to the raster file
DATA_DIR = Path(__file__).parent.resolve() / "data"
PYPROJ#
# In that example we have different CRS systems of the image pose and the mapper
# and therefore we need to activate the network capabilities of pyproj to get the needed grids for transformation
# Alternatively one could specify a directory where grids ares stored
pyproj_network.set_network_enabled(True)  # type: ignore
Camera Model#
# Initialize the camera model of the image
# The camera model's width and height is the image shape which was used for calibration,
# allowing the image class to use resampled images
# The data from the example originates from a bundle block where the images eor and ior (camera calibration) are
# derived together from the bundle adjustment.

cam = CameraOpenCVPerspective(
    width=11648,
    height=8736,
    fx=12906.9238,
    fy=12906.9238,
    cx=5858.437,
    cy=4400.116,
    k1=-0.00565896,
    k2=0.0334872,
    k3=-0.0683847,
    p1=0.000933359,
    p2=0.00065228,
)
Image Class#
# Next we use the camera and the image information to initialize our image class.
# To have a geo-referenced image we need at least know the exterior orientation: Position and Attitude/Orientation
# For this example the Position and Orientation have been exported in GDA2020 / MGA zone 55 coordinate system.

# Position of image
position = np.array([410978.864, 7936876.318, 973.942])

# Attitude of image
orientation = Rotation.from_opk_degree(omega=0.9376, phi=-0.6203, kappa=-56.9427)

# Image Coordinate Reference System
# Australian Projection with the height system AHD (Australian Height datum)
crs = CRS("EPSG:7855+5711")  # GDA2020 / MGA zone 55

# Initializing image class
image = ImagePerspective(
    width=11648,
    height=8736,
    camera=cam,
    position=position,
    orientation=orientation,
    crs=crs,
)
Mapper Class#
# The raster is in GDA94 / MGA zone 55 with the vertical datum AHD (5111)
mapper_crs = CRS("EPSG:28355+5711")

# We will preload the full raster as it is not very large.
mapper = MappingRaster(
    raster_path=DATA_DIR / "dem_01_gda94_mga55_ahd.tif",
    crs=mapper_crs,
    preload_full_raster=True,
)
Map images footprint and center point#
# Map images footprint and center point
# There are 2 ways to specify the mapper, either via the image or a mapper can be stated explicitly.
result = image.map_center_point(mapper=mapper)

if result.ok is True:
    # The returned coordinates will be in the CRS of the image
    print("Mapped Centerpoint (Principle point):", result.coordinates)
    print(f"GDS of center pixel {result.gsd:2.3f} m")
    print("Normal (center):", result.normals[result.mask])
    if result.gsd_per_point is not None:
        print("GSD per point:", result.gsd_per_point[result.mask])
assert result.ok is True  # for testing

result_footprint = image.map_footprint(mapper=mapper)

# The returned coordinates will be in the CRS of the image
if result_footprint.ok is True:
    # Map footprint returns the coordinates, the GSD of the , and the area of the footprint
    print("Mapped Footprint:", result_footprint.coordinates)
    print(f"Mean GSD {result_footprint.gsd:2.3f} m")
    print(f"Area of footprint {result_footprint.area:2.0f} m²")
    print("Normals:", result_footprint.normals)
    if result_footprint.gsd_per_point is not None:
        print("GSD per point:", result_footprint.gsd_per_point)
assert result.ok is True  # for testing
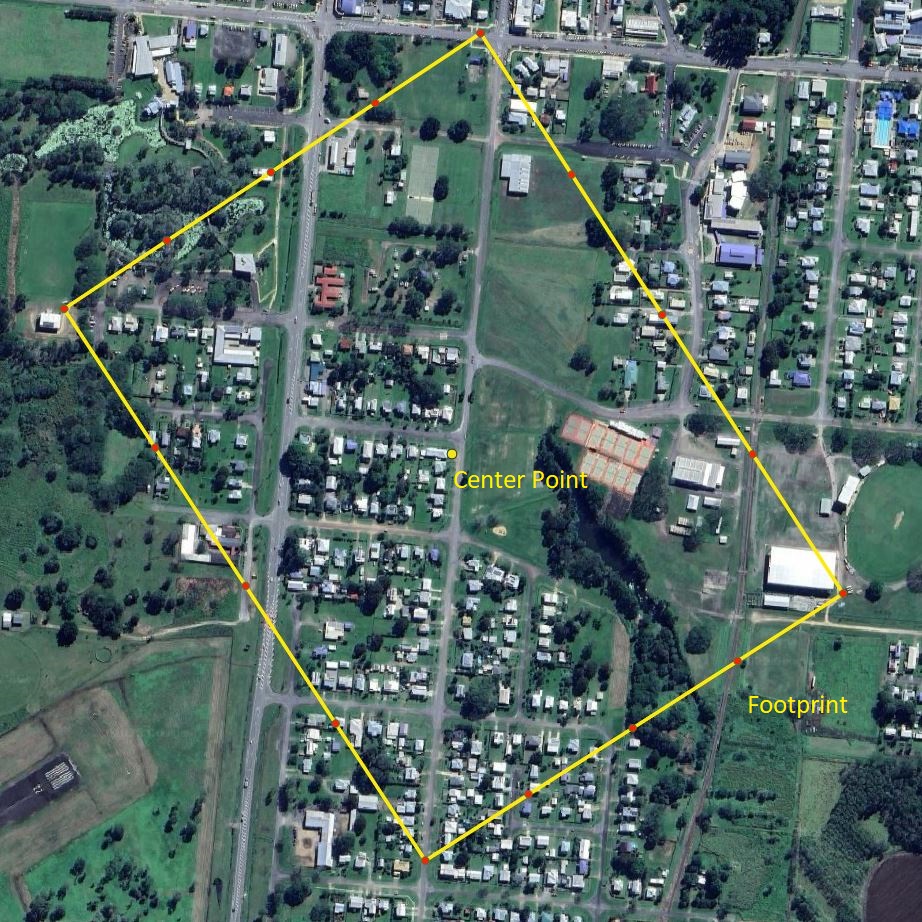
The mapped footprint and center point of that image (red dots are the mapped points of the footprint):
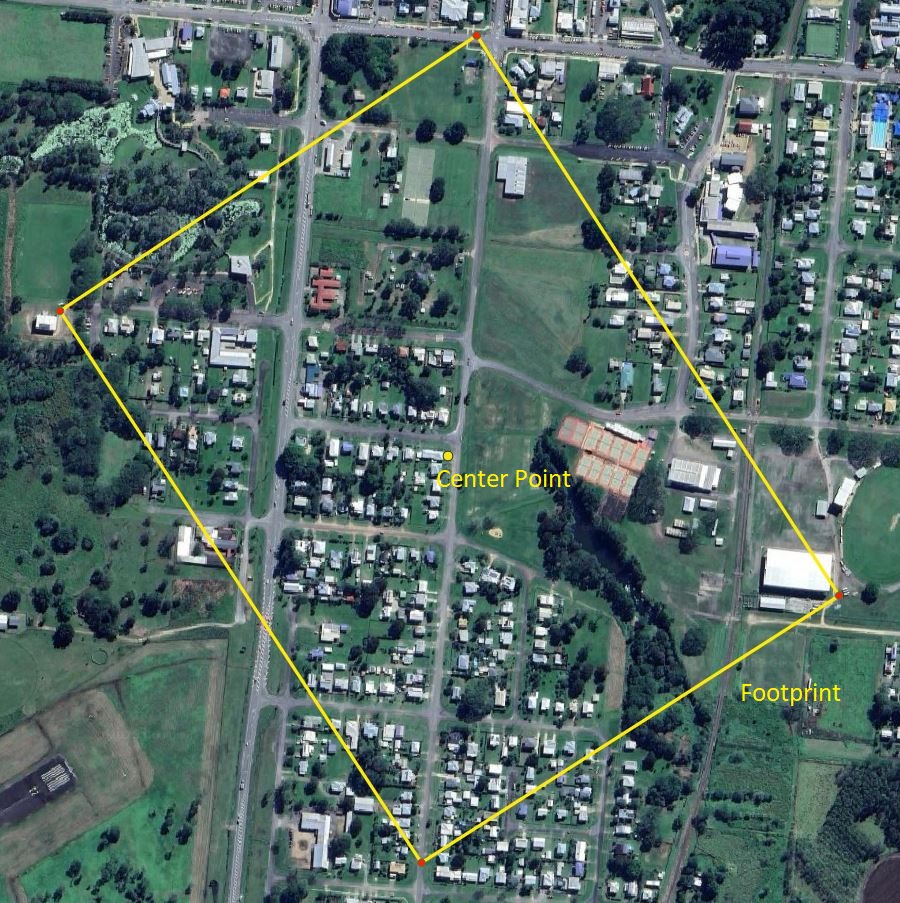
Densify mapped footprint#
# Standard is that only the four corner points of the image are mapped.
# If you provide the argument ``points_per_edge`` you can specify how many points per side should be added.
# This can be useful if the footprint outline should be more accurate on non-flat terrain or large camera distortions

result_footprint = image.map_footprint(points_per_edge=3, mapper=mapper)

# The returned coordinates will be in the CRS of the image
if result_footprint.ok is True:
    # Map footprint returns the coordinates, the GSD of the , and the area of the footprint
    print("Mapped Footprint:", result_footprint.coordinates)
    print(f"Mean GSD {result_footprint.gsd:2.3f} m")
    print(f"Area of footprint {result_footprint.area:2.0f} m²")
    print("Normals:", result_footprint.normals)
    if result_footprint.gsd_per_point is not None:
        print("GSD per point:", result_footprint.gsd_per_point)
assert result.ok is True  # for testing
Now there are 3 additional points on each edge (red dots):