
02-01 - Terrestrial Example#
The following example illustrates how you can project 3D points back into the image.
We want to project the digitized 3D outline of a graffito painted on a wall. The points have been digitized using the Mesh and Texture. The 3D model was created by photogrammetry where as result we get the image exterior orientation and the camera calibration.
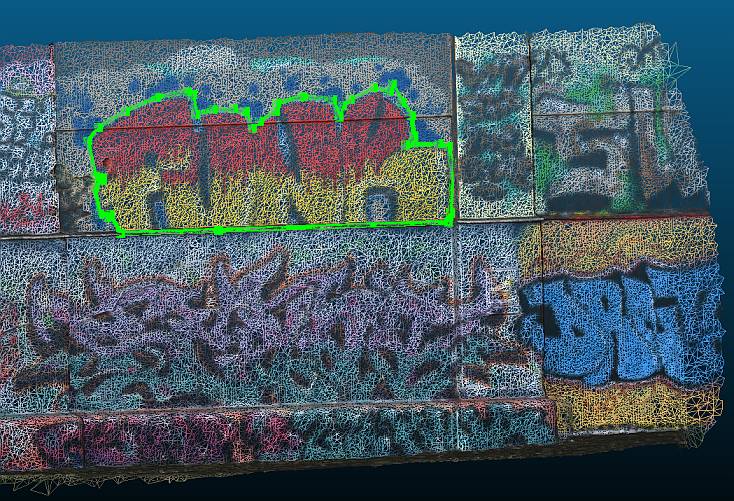
The green line shows the digitized points. The order of the points will be preserved in the output.
Following Steps need to be done:
Create camera class
Create image class
Project 3D points into image
Check validity of projected points
Import Modules#
First we will import all needed Modules
import numpy as np
from pyproj import CRS

from weitsicht import CameraOpenCVPerspective, ImagePerspective, Rotation
3D points#
# Coordinates on wall which should be projected into the images
pts_on_wall = np.array(
    [
        [2638.111, 342715.057, 5.958],
        [2638.040, 342716.320, 5.957],
        [2637.880, 342719.302, 5.964],
        [2637.815, 342719.352, 6.070],
        [2637.812, 342719.400, 6.627],
        [2637.811, 342719.351, 6.817],
        [2637.813, 342719.240, 6.853],
        [2637.834, 342718.806, 6.846],
        [2637.829, 342718.915, 6.925],
        [2637.829, 342718.919, 6.951],
        [2637.856, 342718.884, 7.176],
        [2637.862, 342718.763, 7.331],
        [2637.869, 342718.605, 7.465],
        [2637.869, 342718.646, 7.540],
        [2637.879, 342718.403, 7.505],
        [2637.895, 342718.098, 7.383],
        [2637.902, 342717.994, 7.312],
        [2637.905, 342717.946, 7.192],
        [2637.909, 342717.871, 7.391],
        [2637.93, 342717.470, 7.436],
        [2637.945, 342717.145, 7.367],
        [2637.946, 342717.122, 7.278],
        [2637.958, 342716.915, 7.170],
        [2637.939, 342716.832, 7.097],
        [2637.967, 342716.734, 7.285],
        [2637.976, 342716.583, 7.324],
        [2637.989, 342716.321, 7.324],
        [2638.001, 342716.096, 7.275],
        [2638.002, 342716.063, 7.499],
        [2638.007, 342715.995, 7.531],
        [2638.029, 342715.591, 7.480],
        [2638.050, 342715.190, 7.335],
        [2638.070, 342714.826, 7.160],
        [2638.051, 342714.702, 7.016],
        [2638.058, 342714.777, 6.611],
        [2638.057, 342714.820, 6.598],
        [2638.055, 342714.876, 6.594],
        [2638.049, 342714.873, 6.562],
        [2638.054, 342714.768, 6.490],
        [2638.044, 342714.828, 6.179],
        [2638.035, 342714.916, 6.135],
        [2638.032, 342714.966, 6.178],
        [2638.111, 342715.057, 5.958],
    ]
)
Camera Model#
# Initialize the camera model of the image.
# The camera model’s width and height is the image shape which was used for calibration,
# allowing the image class to use resampled images.
# The data from the example originates from a bundle block where the images eor and ior (camera calibration)
# are derived together from the bundle adjustment.
cam = CameraOpenCVPerspective(
    width=8256,
    height=5504,
    fx=4678.56,
    fy=4678.56,
    cx=4200.726,
    cy=2750.842,
    k1=-0.04308,
    k2=0.0137,
    p1=-0.000752,
    p2=0.00278,
)
Image Class#
Next we use the camera and the image information to initialize our image class. To have a geo-referenced image we need at least know the exterior orientation: Position and Attitude/Orientation
# Position of image
position = np.array([2643.207, 342717.072, 4.916])
# Attitude of image
orientation = Rotation.from_opk_degree(omega=-53.782, phi=86.843, kappa=144.631)

# Image Coordinate System
crs_image = CRS(31256)  # Austrian coordinate system

# Initializing image class
image = ImagePerspective(
    width=8256,
    height=5504,
    camera=cam,
    position=position,
    orientation=orientation,
    crs=crs_image,
)
Calculate Projections#
result = image.project(pts_on_wall, crs_s=CRS(31256))

if result.ok is True:
    nr_valid = len(np.flatnonzero(result.mask))
    print(f"Number of 3d points: {pts_on_wall.shape[0]}")
    print(f"Number of valid re-projected points: {nr_valid}")
    print(result.pixels)
The pixel position of the projected points look like this (light green line):
Second Image#
We do the same for another image of the same photogrammetric block.
It is the same camera used which shares the same camera calibration, therefore we can reuse cam for image_2
# Position of second image
position_img_2 = np.array([2642.714, 342713.260, 4.953])
# Attitude of second image
orientation_img_2 = Rotation.from_opk_degree(omega=81.508, phi=57.961, kappa=5.612)

# Initializing image class of second image
image_2 = ImagePerspective(
    width=8256,
    height=5504,
    camera=cam,
    position=position_img_2,
    orientation=orientation_img_2,
    crs=crs_image,
)

result_img_2 = image_2.project(pts_on_wall, crs_s=CRS(31256))
if result_img_2.ok is True:
    nr_valid = len(np.flatnonzero(result_img_2.mask))
    print(f"Number of 3d points: {pts_on_wall.shape[0]}")
    print(f"Number of valid re-projected points: {nr_valid}")
    print(result_img_2.pixels)
The pixel position of the projected points look like this for the second image (light green line):